 Plantico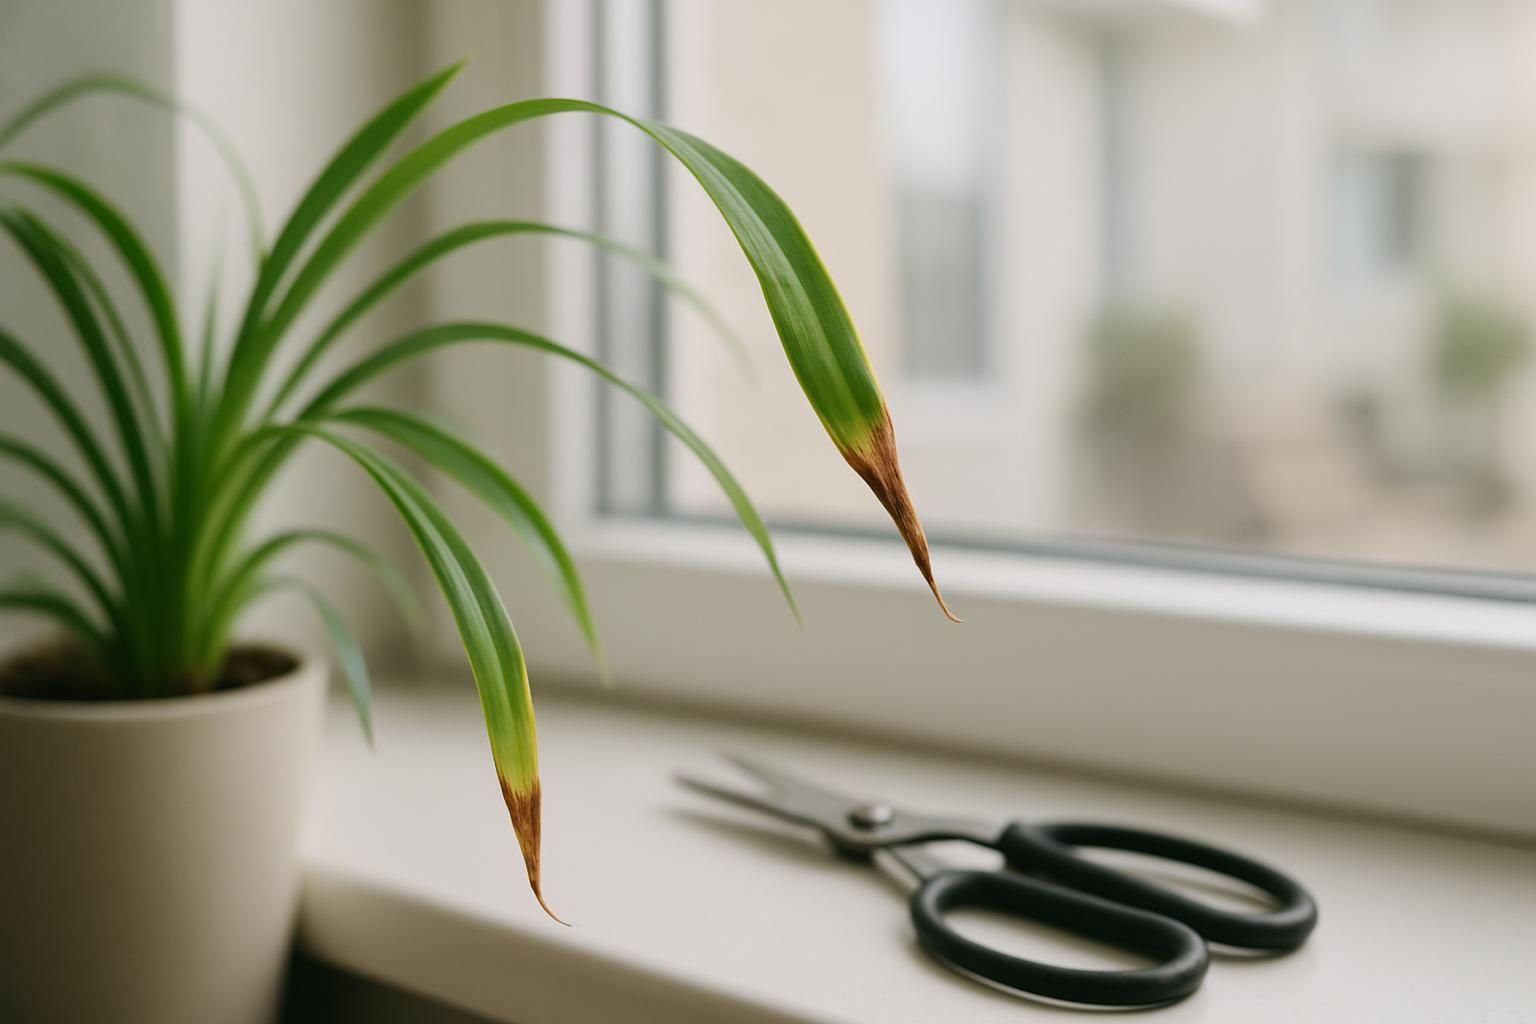
Brown, crispy leaf tips look dramatic, but they rarely mean your plant is doomed. Tip burn is usually a stress signal: inconsistent watering, salt or fertilizer buildup, dry air, heat, or sensitive roots reacting to tap water. This guide shows you how to tell tip burn from disease, clean up the damage, fix the underlying cause, and keep it from coming back.
Step 1: Confirm It’s Tip Burn, Not Disease or Pests
Before you fix anything, make sure you’re dealing with tip burn and not a leaf spot disease or chewing pests. Tip burn has a distinct look and feel.
- Location: Browning starts at the very tip or along the outer edge of leaves, moving inward. Centers of leaves usually stay green.
- Texture: The brown area feels dry and papery; it may curl or feel crispy to the touch.
- Color pattern: A sharp transition from green to tan/brown, sometimes with a thin yellow halo.
- Spread: Affects multiple leaves similarly, often older leaves first.
What it’s not: irregular brown blotches in the middle of leaves, circles with halos, mushy or wet-looking lesions, or holes often point to something else. If you see spots instead of edges/tips, compare symptoms in our guide to brown spots on leaves. Chewing damage, webbing, sticky residue, or tiny moving dots suggest pests and call for a different plan.
Step 2: Trim and Clean to Stop the Spread
Trimming won’t cure the underlying issue, but it immediately improves appearance and helps the plant redirect energy to healthy tissue.
- Sterilize tools: Wipe scissors with isopropyl alcohol.
- Follow the leaf’s shape: Cut just outside the brown area, angling the cut to mimic the natural leaf tip. Leave a thin margin of brown if cutting into green would remove too much.
- Remove fully dead leaves: Snip at the base of the petiole without nicking the stem.
- Clean the pot rim and soil surface: Brush away any white crust (a sign of salt buildup) so you can better assess the next steps.
Trimming does not harm the plant when done cleanly. You won’t “unlock” new tips on those leaves; you’re simply tidying and preventing further cracking of dead tissue.

Step 3: Diagnose the Underlying Cause
Tip burn is a symptom, not a cause. Use these clues to pinpoint what to fix:
- Underwatering or big swings: Leaves feel thin or limp before watering, the pot is very light, soil pulls from the pot edges, and tips crisp soon after a drought cycle.
- Low humidity: Common in ferns, calatheas, marantas, and fittonia. Edges crisp even when soil moisture is on point. You may see curled leaf margins.
- Fertilizer or salt buildup: White crust on soil or pot, scorched tips soon after feeding, or if you use softened water. Often shows on dracaena, spider plant, and palms.
- Tap water sensitivity: Dracaena, spider plant, prayer plant, and some palms react to fluoride/chlorine with brown tips despite good watering habits.
- Heat or drafts: Pots near radiators, heat vents, or hot sun patches dry out fast and crisp the edges.
- Rootbound or compacted mix: Roots circling the pot, water sheets off or runs through instantly, top dries fast but the core stays dry, leading to inconsistent moisture.
If you’re unsure of your plant’s identity (important for knowing whether it’s moisture- or fluoride-sensitive), quickly identify a plant from a photo. Knowing if you have a dracaena versus a philodendron changes the priority fix.
Step 4: Fix Watering and Flush the Soil
Two things immediately help most tip-burn cases: steady moisture and removing built-up salts.
Set a reliable watering pattern
- Check the top 2–3 cm of soil with your finger. Water when it’s dry at that depth for most tropical houseplants.
- Water thoroughly until excess drains. Don’t just sprinkle the top; fully hydrate the root ball.
- Empty saucers after 10 minutes so roots aren’t left sitting in runoff.
If you struggle to time it, this guide to how often to water houseplants gives simple ways to match watering to pot size, mix, and light.
Leach (flush) salts out of the soil
- Move the plant to a sink, tub, or outside spot where it can drain freely.
- Slowly pour clean water over the soil, letting it drain out the bottom. Repeat several times so the entire root ball rinses through.
- Let it drain fully before returning it to its cover pot or saucer.
- Hold fertilizer for 3–4 weeks after a flush to avoid re-stressing the roots.
Use plain tap water if that’s what you have, unless your plant is known to be sensitive. If you suspect fluoride or softened water is contributing, flush with filtered, rain, or distilled water instead.
Step 5: Boost Humidity (For Sensitive Plants)
Some plants crisp at the edges even with ideal soil moisture because the air is dry. If you grow calathea, maranta, ferns, or fittonia, consider raising humidity around the plant.
- Humidifier: The most reliable method. Run it near the plant to keep the surrounding air comfortably moist.
- Pebble tray: Fill a shallow tray with pebbles and water, then set the pot on top so the base is above the waterline. Refill as it evaporates.
- Group plants: Clusters of foliage slightly increase local humidity.
- Choose the room: Kitchens and bathrooms often have moister air than living rooms or offices.
Misting can briefly raise humidity but also encourages leaf spotting and pests on some species. If you mist, do it early in the day so leaves dry quickly.
Step 6: Switch Water or Repot If Needed
Try a different water source for sensitive species
- Use filtered, rain, or distilled water for dracaena, spider plants, marantas, and some palms that react to tap additives.
- Avoid water from softeners that add salts; it can worsen tip burn.
Repot rootbound plants or refresh a compacted mix
- Check roots: Slide the plant out. If roots are circling tightly or there’s little soil left, it’s time to repot.
- Choose a pot 2–5 cm wider with drainage. Avoid oversized jumps that keep soil wet too long.
- Refresh the mix: For aroids (monstera, philodendron), use a chunky, airy mix with some bark or perlite. For ferns and calathea, use a moisture-retentive but well-draining mix.
- Water through after repotting to settle the soil, then let the top layer dry to your species’ preference before the next watering.
If the existing mix is fine but salts have built up, a thorough flush may be enough. Repot if you see stubborn crusting, sour smells, or water refuses to soak in.
Step 7: Adjust Light, Heat, and Feeding
Environmental tweaks reduce stress and future browning:
- Light: Most tropicals prefer bright, indirect light. Harsh midday sun can overheat leaves and edges; sheer curtains help.
- Heat: Keep plants away from radiators, heat vents, or hot window glass that cooks the leaf margins. Avoid cold drafts, too.
- Feeding: Use a balanced, diluted fertilizer during active growth only. Skip feeding for a few weeks after you see tip burn.
- Airflow: Gentle airflow helps leaves dry after watering and reduces fungal issues without wicking too much moisture from the leaf edges.
Ongoing Prevention and Monitoring
Once you’ve cleaned up and made changes, keep an eye on new growth. The goal isn’t to fix old damage (that tissue is dead) but to prevent browning on future leaves.
- Watch new leaves: If fresh growth stays intact, your fix worked. If tips on new leaves brown again, revisit watering and water source.
- Stay consistent: Check soil moisture on a set cadence. Plantico can remind you to check rather than water on a rigid schedule so you avoid swings.
- Leach periodically: If you fertilize regularly or have mineral-rich water, flush the pot every couple of months to rinse away salts.
- Dust leaves: Clean leaves breathe and transpire better. Wipe with a damp cloth and support the leaf from below.
- Seasonal shifts: Homes get drier in winter with heating. Raise humidity or water a bit more frequently as the air dries, while still letting the top layer of soil dry between waterings.
If you’re still unsure whether you are dealing with edge burn versus spotting, revisit the symptoms in our guide on brown spots on leaves, and use Plantico’s photo tools to compare patterns with similar issues.
Conclusion
Crispy brown leaf tips are a common stress response, not a death sentence. Clean up damaged edges, stabilize soil moisture, flush away salts, raise humidity for sensitive species, and consider switching water or repotting if roots are cramped. With those steps and steady care, the next leaves should emerge clean and stay that way.